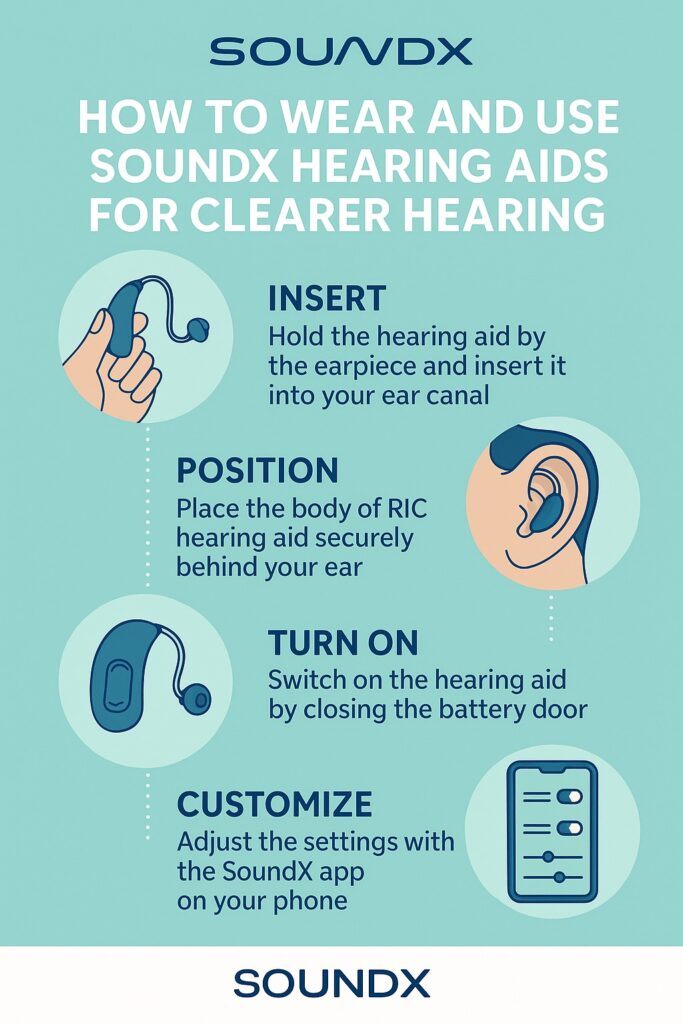
How to Wear and Use SoundX Hearing Aids for Clearer Hearing
- 18 May 2024 7 min read
- Top Hearing Aid Brands in India: Which One Is Right for You? - February 3, 2026
- Ear Machine for Deaf People: Types, Benefits, and Price Guide - February 3, 2026
- Choosing the Right Hearing Aid in Gurgaon Without Overpaying: Prices, Types & Fitting Guide - January 13, 2026
Written by- Mr Shivam Singh
This guide will help you learn how to set up, use, and take care of your SoundX hearing aids. It will show you easy steps so you can hear better and keep your hearing aids working well every day.
“SoundX proudly participates in ISHACON 2025, Patna, Bihar — one of India’s largest and most respected audiology conferences!”
What Are the Main Parts of SoundX Hearing Aids and How They Work?
- Microphone: The microphone on your hearing aids captures sound from your environment, allowing you to hear conversations, music, and other sounds with clarity.
- Multi-function Button 1: This button serves multiple purposes. You can adjust the volume of your hearing aids using Button 1. Additionally, pressing and holding Button 1 for a few seconds turns the hearing aids on or off.
- Multi-function Button 2: Button 2 also offers versatility. It allows you to decrease the volume of your hearing aids and switch between different hearing programs. Press and hold Button 2 to activate these functions.
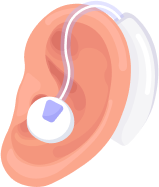
- Ear Tube: The ear tube is a crucial component that connects the eartip to the main body of the hearing aid. It ensures a secure and comfortable fit within your ear canal.
- Stabilization Bar: To prevent the eartip from moving out of place, the stabilization bar provides stability and comfort throughout the day.
- Eartip: Made of soft silicone, the eartip holds the hearing aid securely in your ear canal. It’s essential for comfort and proper functionality. It is available in multiple sizes and can be replaced depending on the size of your ear canal. It is also available in perforated and closed styles, which can be used as per the recommendation of your SoundX audiologist.
- Charging Contact: These contacts allow for easy charging of your hearing aids. Simply place them in the charging case, and they’ll begin charging automatically.
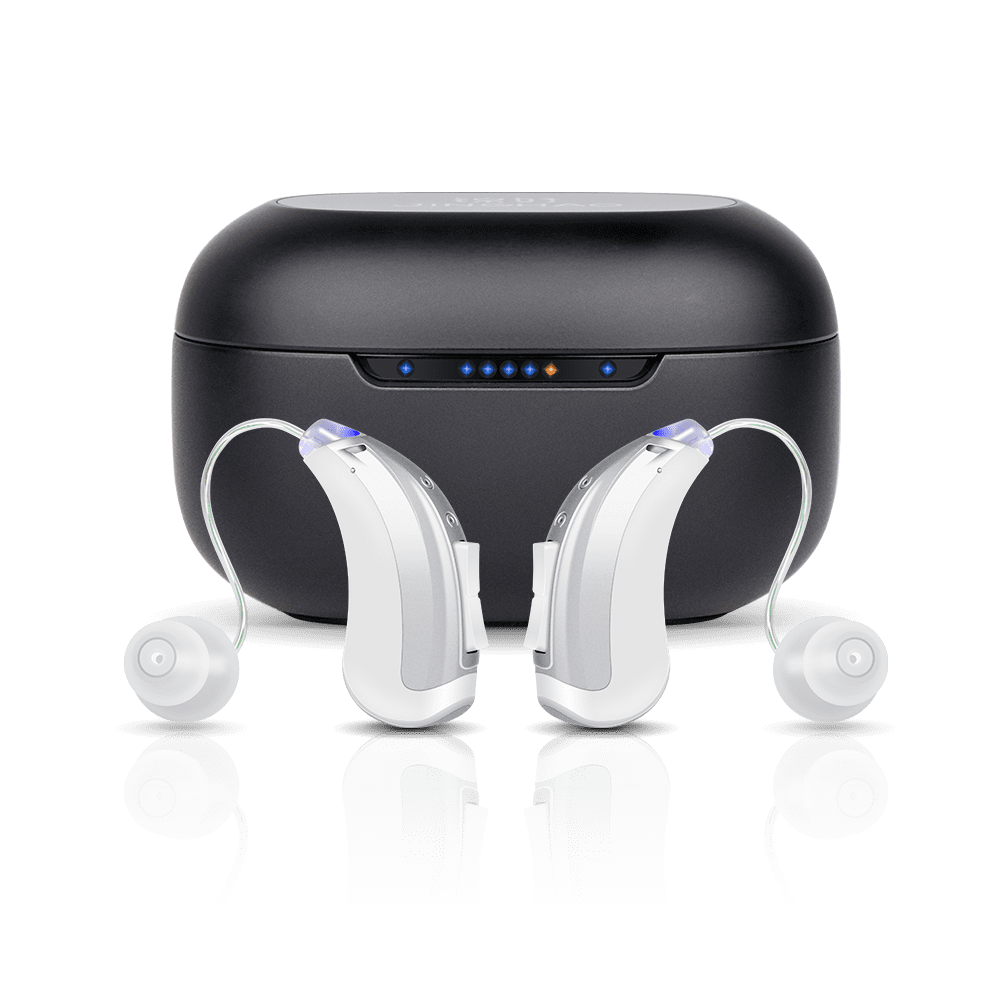
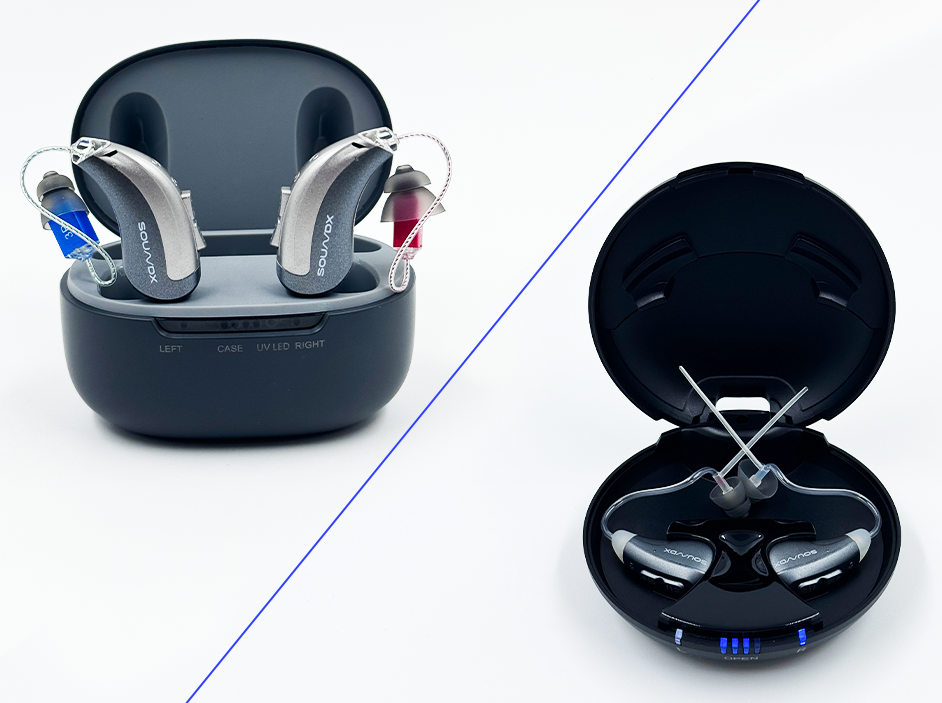
- Charging Case: A portable charging case included for convenient recharge-ability of your hearing aids on the go. One full charge will provide up to 18 hours of enhanced hearing.
Charging Case
Your charging case is an essential accessory for storing and charging your hearing aids:
- Charging Slots: The charging case features dedicated slots for each hearing aid, ensuring they receive the power they need to function optimally.
- Indicator Lights: LED lights on the charging case provide visual feedback on the charging status of your hearing aids and the case itself. This allows you to monitor the charging progress conveniently.
- Charging Port: Connect the charging case to a power source using the included USB cable. This ensures that your hearing aids are always ready for use whenever you need them.
Accessories
The product comes with the below listed accessories.
| Items | Description |
| Eartip × 10 | To hold the hearing aid comfortably and securely in the ear canal |
| USB Cable x 1 | Used to charge the charging case |
| Cleaning Tool × 1 | Used to clean hearing aids and charging case |
| Manual x 1 | Used for users to read and understand how to use hearing aids and other objects |
Using Your SoundX Hearing Aids: Simple Steps to Get Started
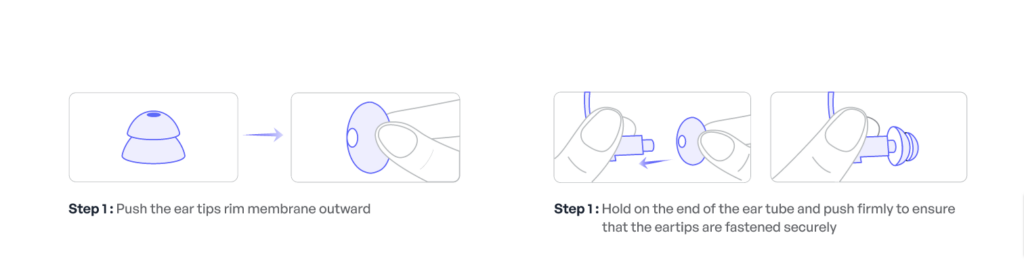
Fitting Eartips
- Selecting Eartips: Choose the eartip size that provides the most comfortable and secure fit for your ears. It’s essential to experiment with different sizes to find the perfect fit.
- Attaching Eartips: Once you’ve selected the appropriate eartip size, attach it securely to the ear tube. Ensure that the eartip is pushed firmly onto the ear tube to prevent it from coming loose.
Ear Tube Replacement
- Removing Ear Tubes: To replace the ear tubes, gently rotate them and pull them out of the hearing aids. Take care not to apply too much force to avoid damaging the devices.
- Inserting New Ear Tubes: When inserting new ear tubes, align them with the corresponding slots on the hearing aids and gently push them into place until they’re securely seated.
Power On/Off
- Turning On: To power on your hearing aids, press and hold Button 1 for approximately three seconds. You’ll hear a notification sound indicating that the devices are now powered on and ready to use.
- Turning Off: Similarly, to power off your hearing aids, press and hold Button 2 for about three seconds. You’ll hear a notification sound confirming that the devices have been powered off.

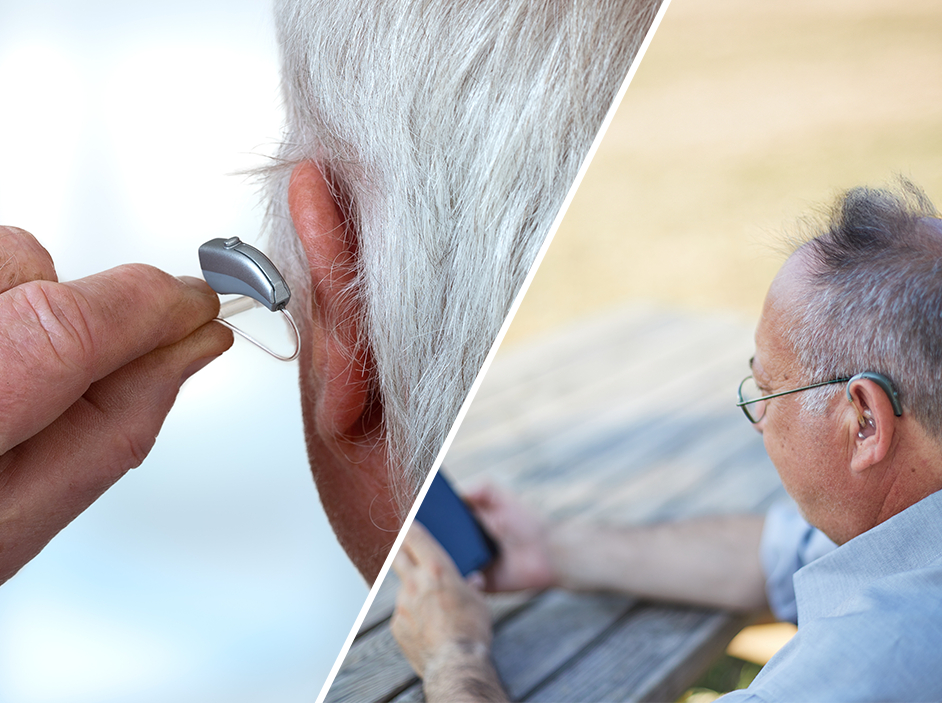
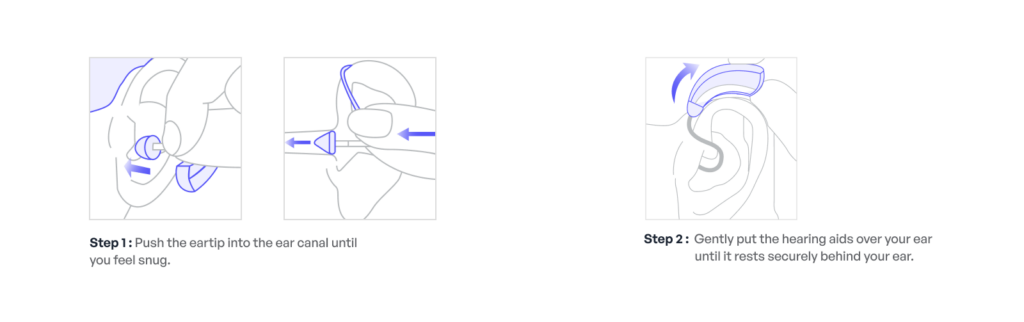
Wearing/Removing Hearing Aids
- Wearing Hearing Aids: Insert the hearing aids gently into your ear canal, ensuring that the eartips are securely seated. Once in place, the devices should feel comfortable and snug.
- Removing Hearing Aids: To remove the hearing aids, gently pull them out of your ear canal while holding onto the stabilization bar. Take care not to apply excessive force to avoid discomfort.
Volume Control
- Adjust the volume of your hearing aids using the multi-function buttons. Each press of Button 1 or Button 2 will increase or decrease the volume, respectively.
- You’ll hear a “Beep” sound each time you adjust the volume, allowing you to gauge the changes in volume levels.
Programs Switching
- Your hearing aids come with multiple preset programs designed to enhance your listening experience in different environments.
- If you want to understand your hearing profile better before programming your hearing aids, you can take a hearing test and learn how to read an audiogram.
Specific programs are associated with different prompt tones as mentioned in the table below:
| Hearing Program | Prompt Tone | |
| 1 | Program 1 | beep |
| 2 | Program 2 | beep beep |
| 3 | Program 3 | beep beep beep |
| 4 | Program 4 | beep beep beep beep |
Bluetooth Connectivity
- Bluetooth technology allows you to connect your hearing aids to compatible devices such as smartphones, tablets, and computers.
- To initiate a Bluetooth connection, ensure that Bluetooth is enabled on your device and follow the pairing instructions provided in your device’s user manual.

SoundX App
- The SoundX app provides additional functionality and customization options for your hearing aids. Download the app to your smartphone and follow the on-screen instructions to set up your devices.
- With the SoundX app, you can:
- Adjust volume levels
- Switch between hearing programs to suit your environment
- Explore our best hearing aids to choose one that fits your lifestyle
- Learn about hearing loss via blogs and educational videos
- Contact SoundX expert audiologists
- Take a hearing test and program your hearing aids according to your hearing loss profile
Charging Your Devices
Charging Hearing Aids
- Placing in Charging Case: When it’s time to charge your hearing aids, simply place them in the designated slots within the charging case. Ensure that they’re properly aligned to facilitate charging.
- Monitoring Charging Status: LED indicator lights on the charging case will illuminate to indicate that the devices are charging. A blue light indicates that charging is in progress, while a white light indicates that the devices are fully charged.
Charging the Charging Case
- Connecting USB Cable: Use the included USB cable to connect the charging port of the case to a power source, such as a computer or wall adapter.
- Monitoring Battery Capacity: LED lights on the charging case will provide real-time feedback on the remaining battery capacity, allowing you to plan your charging schedule accordingly.
Device Care Tips
- Handle your hearing aids with care to avoid drops or impacts that could damage the devices.
- Refrain from using sharp objects to clean earwax, as this could cause damage to the eartips and ear tubes.
- Store your hearing aids in a cool, dry place away from moisture and extreme temperatures to prevent damage.
- Remove your hearing aids before swimming, showering, or engaging in activities that expose them to water.
- Regularly inspect and clean your devices to remove debris and maintain optimal performance.
- Replace eartips every few months to ensure a secure and comfortable fit, and consider replacing ear tubes if they show signs of wear or damage.
This comprehensive user manual provides detailed instructions on using and caring for your SoundX hearing aids. If you have any questions or encounter any issues, don’t hesitate to consult this guide for assistance.
FAQ
1. How do I turn my SoundX hearing aids on and off?
To turn them on, press and hold Button 1 for about 3 seconds until you hear a sound. To turn them off, press and hold Button 2 for 3 seconds.
2. How long do my SoundX hearing aids last after a full charge?
When fully charged, your hearing aids can work for up to 18 hours. Always charge them overnight or when the battery gets low.
3. How do I charge my SoundX hearing aids?
Place them in the charging case. The blue light means they’re charging, and the white light means they’re fully charged.
4. Can I connect my SoundX hearing aids to my phone?
Yes! Your hearing aids have Bluetooth. Just turn on Bluetooth on your phone and follow the pairing steps shown on your phone’s screen.
5. What is the SoundX app for?
The SoundX app helps you control your hearing aids easily. You can adjust the volume, switch programs, take hearing tests, and even talk to an audiologist through the app.
6. How do I clean my hearing aids?
Use the cleaning tool that comes in the box. Gently remove dirt or earwax. Don’t use sharp objects or water to clean them.
7. How do I know which eartip size is right for me?
Try a few sizes to see which one feels most comfortable and fits securely. Your SoundX audiologist can also help you choose the right size.
8. What should I do if my hearing aids stop working?
First, check if they are charged and turned on. If they still don’t work, make sure there’s no dirt blocking the eartip. If the problem continues, contact SoundX support for help.
Mr Shivam Singh Audiologist says:
Not all hearing loss needs surgery . In fact most cases can be managed with modern hearing aids. But in some structural or medical cases, surgery can help.